
Over the christmas holidays I tried to figure out how to live stream the video from my HD-PVR to Twitch.tv on Mac OS with ffmpeg without CamTwist, without XSplit and without JTVLC. Twitch.TV is a video broadcast service where you can stream and watch your gaming content. Its main purpose is for the e-sport and speedrun community but there are more and more normal gamers streaming their content – including me since a few days.
Streaming without preview windows recording
I am not able understand why most people try to record a preview window of the HD-PVR with a desktop recording software. The HD-PVR sends a high quality 1920 × 1080 pixel MPEGTS Stream over HDMI or Component and I thought that is should be possible to process this stream directly. It seems like it is possible and it quite easy if you know how to do it.
The downside is that I don’t know any option to include a stream from a webcam and microphone. Maybe someone else is more clever than me and will provide one. The HD-PVR Capture Software will cost you $30 but it is worth any penny for people who want to record their recorded HD-PVR footage with a mac . Here we go.
Step 1 : Configuring HD-PVR Capture
Download and install HD-PVR Capture. There is also a demo version available.
With this software we will send the output signal of the HDPVR to the ffmpeg encoder using UDP. I strongly prefer this software over Arcsoft Showbiz on Windows because of its simplicity and reliability.
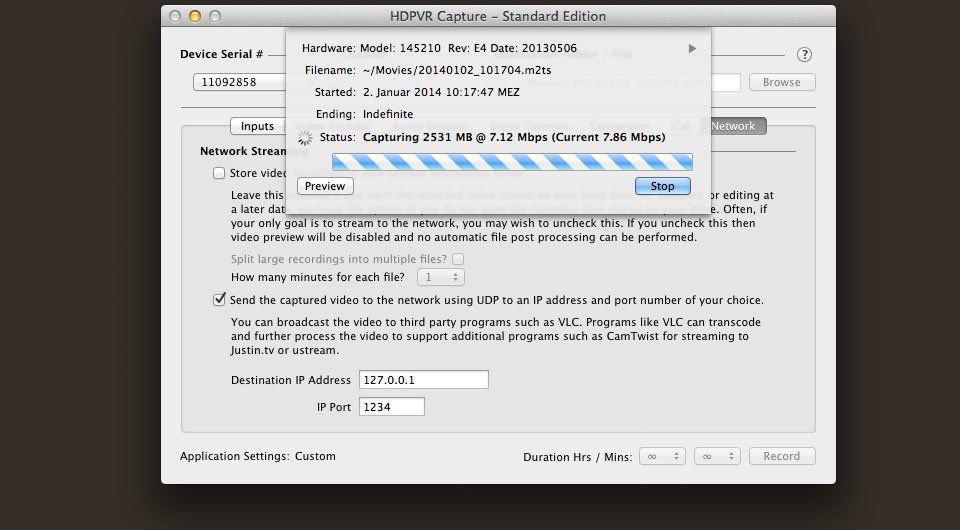
In HD-PVR Capture are two important settings: Video Encoder and Network.
Video Encoder
- Select the preset „best“.
Personally I think that the insane setting is unnecessary in this case because we will encode the video for web streaming.
Network
- Uncheck the „Store video recording“ option.
We don’t want to fill up our hard drives with tons of videos. - Check the „Send the captured video to network using UDP“ option.
As the IP address use your local ip 127.0.0.1 and the port 1234.
You can verify that it works this if you press the record button, start VLC and go to file -> open network and put this into the address field: udp://@:1234. Hit the play button and you should see the output video mpegts stream of your HDPVR.
Step 2: Setting up ffmpeg
Download and install ffmpeg for mac. You can do this via „brew„. Inside the zip archive you will find the the extracted file „ffmpeg“. This is the executable file and should be moved to the directory /usr/local/bin/. You can do this using Terminal with the command:
sudo mv ~/Downloads/ffmpeg /usr/local/bin/ Or copy it with the finder from Downloads to the /usr/local/bin/ folder.
Step 3: Executing the ffmpeg command
This is the ffmpeg command with several parameters which has to be executed using the Terminal. This will grab the stream from HDPVR Capture, encode it on the fly and sent it directly to the twitch servers.
ffmpeg -f mpegts -re -i 'udp://127.0.0.1:1234?fifo_size=640000&buffer_size=640000&overrun_nonfatal=1' -vcodec libx264 -s 1280x720 -g:v 40 -threads 4 -preset medium -b:v 850k -minrate 850k -maxrate 850k -bufsize 1600k -r 30 -acodec libmp3lame -ar 44100 -b:a 64k -async 44100 -f flv "rtmp://live.justin.tv/app/live_XXXXXXX_XXXXXXX"Replace live_XXXXX_XXXXXXXX with your personal Twitch.tv Key and then use this command on the terminal to stream the UDP Stream from HDPVR Capture to Twitch.tv.
Here is a little explanation of the few options I think I understand:
| -f | Sets the input format to MPEGTS. Should be set automatically but I wanted to be sure. |
| -i | Sets the UDP stream from HD-PVR Capture as the input file for the encoding. |
| ?fifo_size buffer_size overrun_nonfatal | Parameters for the UDP stream. buffer_size was my missing piece to get rid of the artifacts I was getting in twitch. Took me 2 days to figure this out. |
| -re | activates realtime mode |
| -vcodec | Sets the video codec to libx264. It is an open source video codec for H.264. |
| -s | The resolution of the encoded output format. I chose 720p because it made the most sense to me. Change this if you need to. UPDATE: Changed it to 720p. Better quality. |
| -g:v | Sets the maximum keyframe interval to 2. Important for twitch. |
| qscale:v | Sets the quality scale. :v means that this is only used for video and not audio. 1 is best, 31 is worst. UPDATE: Removed this part because -b:v overrides this setting. |
| -threads | Specifies the number of CPU Threads used for encoding. I use 6 on my Core i7. UPDATE: Removed. |
| -preset | There are many presets for the encoder from ultrafast, fast and medium to slow and very slow. Ultrafast is too blocky. The presets „medium“ and „fast“ seem right. |
| -b:v -minrate –maxrate | Sets the encoding bitrate to 800 kbytes with a maximum and minimum bitrate of 800 kbytes excluding audio. This simulates a Constant Bitrate (CBR) which is important for twitch. Change this if you have more bandwidth for the upstream than me (10Mbit). |
| -bufsize | Honestly I don’t really understand what it does. I think this is the size of the buffer for the encoding but I am not sure. I read that this is important for the CBR. |
| -r | Sets the frame rate to 30 frames per second. Change this if you like. |
| -acodec -ar -b:a | Sets the LAME Audio as audio encoder with a sample rate of 44,100 Hz and 64kbytes per second for the encoding. |
| -f | Sets the output format to a FLV container. |
| rtmp | rtmp://live.justin.tv/app/live_key sets the output format to Real Time Messaging Protocol with the server address of twitch.tv or justin.tv. live_XXXX_XXXXXXXXXX has the be replace with your personal Twitch.tv API Key. You will find the key on your twitch.tv dashboard under API Key. |
The result should look like this:

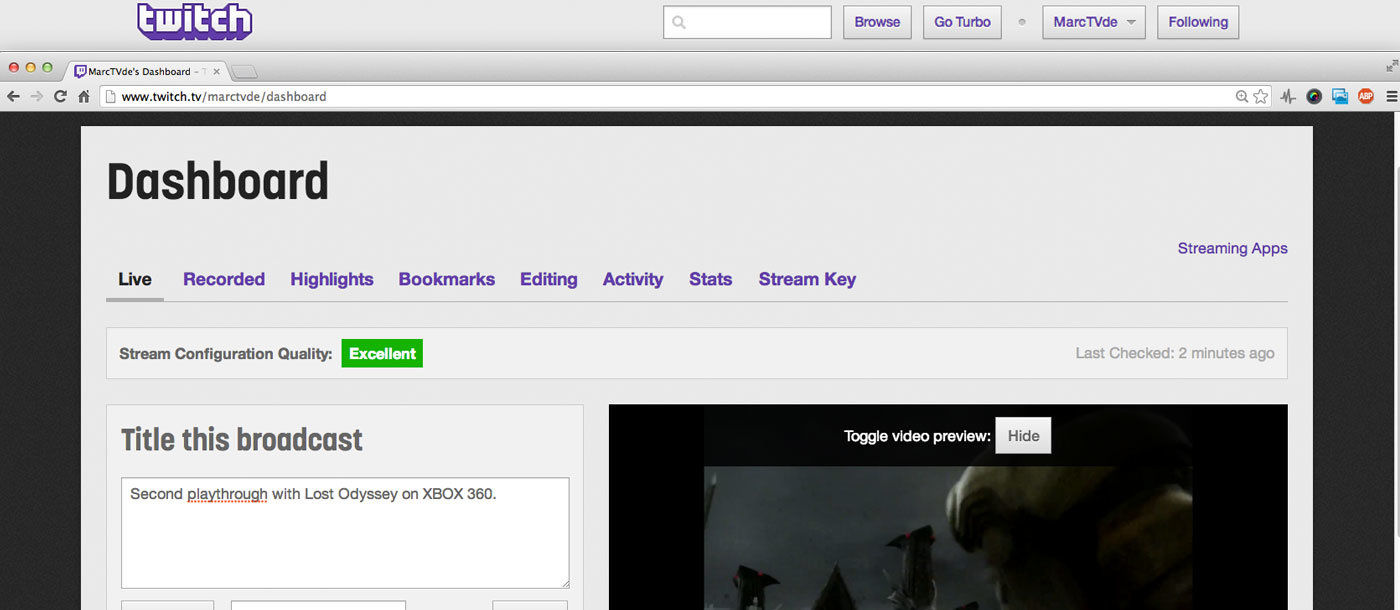
Step 4: Check the twitch dashboard
The UDP Stream from the HD-PVR Capture software is now used by the ffmpeg encoder and is directly send to the twitch servers using RTMP. I get a descent result, a stable frame rate of 30 frames, nearly no compression artifacts and a Stream Configuration Quality: Excellent message on twitch. I don’t know why there are these not-existing PPS referenced error messages showing up but it does not seem to harm the stream quality.
I developed a plugin for wordpress MarcTV Twitch Status which shows the „Live!“-Status of your Twitch account.
You can find my twitch channel here. Feel free to correct my settings and post them in the comment section below.


Schreibe einen Kommentar